Learning the finger pricking method of blood collection is a primary requirement of physiology students.
As blood flows within the cardiovascular system, we need to puncture the skin in order to obtain its sample.
Table of Contents
ToggleWhat is blood sample?
Blood sample term is used for the small amount of blood (a few drops or a few milliliters) which is collected from a person for certain laboratory investigations.
These investigations may be for diagnostic or prognostic purpose of the diseases.
For routine laboratory tests, blood is collected from 3 common sites,
- Capillary pads- if we need only few drops of blood.
- Superficial veins- if we need a few ml of blood.
- Arterial blood gases- in case of patients on ventilator from radial or femoral arteries.
Note: arterial blood and blood from heart chambers also may be required for special tests.
So, the quantity of blood sample decides the method.
Whenever we require only few drops of blood, we choose capillary pads for blood sample collection.
Choices are,
1.LIPS: but we will avoid as,
- It’s painful
- Chances of infection is more
- Indecent
2.FINGER AND TOE TIPS: avoid toe due to more chances of infection
So, finger tips should be our choice for blood collection.
What hand and finger we should choose?
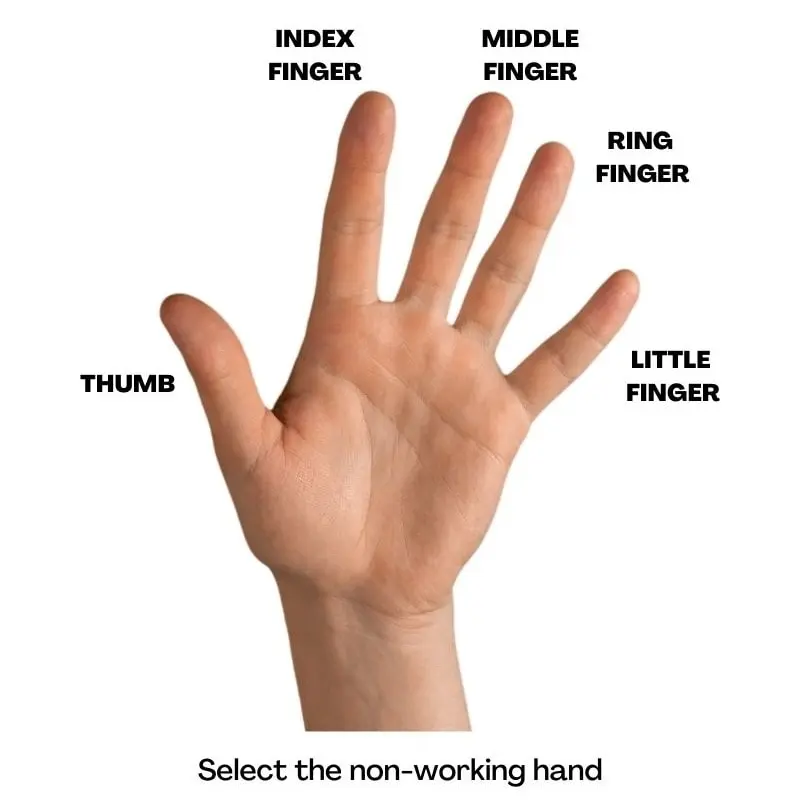
God have given us 10 finger tips.
Select the hand which is non-working, it may be Right or Left.
If we exclude the thumbs, we have four fingers left.
Even in non-working hand, for some work thumb and index finger is used for work.
Small finger (little finger) has small capillary pad so avoid it.
So, we decide our first choice out of two… middle finger and ring finger.
FIRST CHOICE
First choice is given to the ring finger considering its low utility.
(Even while chanting mantra or mala this Ring finger is prevented to touch and is also used to wear engagement ring.)
First choice is also given to the Middle finger considering its thick capillary pad.
We give first choice to Ring finger and when second pricking is required at the same time, next prick will be on Middle finger.
So, the place or anatomical location is decided but our choice have anatomical reason also,
Our fingers have short bursa, limiting the length of finger. So, if the finger gets infected, it will not just spread in palm but, along with bursa whole circulation and nerve supply of hand may get affected.
Sites of finger pricking
Fingers are selected but, in some disease conditions, there are no finger tips in present for pricking.
e.g., Leprosy
Next site is Ear lobe.
At certain age of patient, finger tips and ear lobes remain very small.
e.g., New born babies
So, pricking should be done at Heel… not in center, but little on side.
Instruments used for finger pricking
- Disposable pricking lancet
Advantages- disposable; triangular in shape so, tip is self-limiting to produce injury.
- Triangular cutting needle (straight)
Advantages- reusable and self-limiting to produce injury.
- Do not use syringe needle
Disadvantages- central bore may carry infection; no self-limiting and it makes hole.
Finger pricking method
How to prick?
Hold the ring finger to be punctured in your LEFT HAND.
Longitudinal axis of finger tip should be raised into a small ridge.
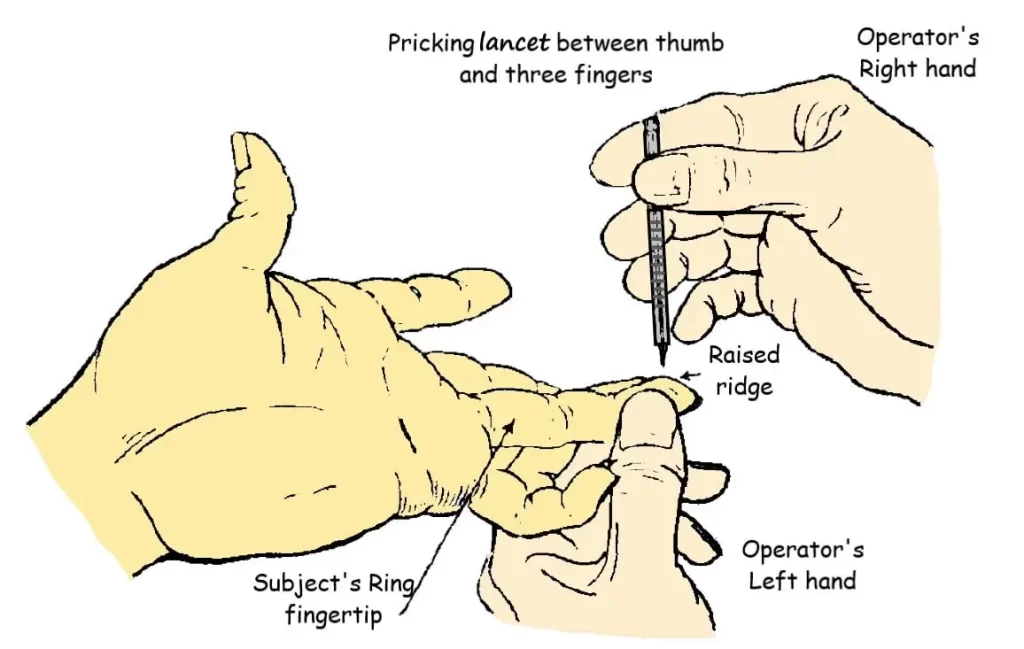
Grip the pricking lancet in your Right hand (lies between fingers) between the thumb and three middle fingers (lies outer side).
Keep the finger to be pricked steady by using support of your left hand.
You can use a stable furniture to support subject’s elbow.
(Learn to keep the subject occupied in conversation in order to divert his attention and prick when he is momentarily unaware.)
PRICKING
- Keep all the equipment ready for your examination before you proceed to prick.
- Prick on top of the ridge with a bold stab.
- Now release the pressure which caused the ridge.
- Remember, one deep prick is much less painful than two or three superficial pricks.
RIGHT PRICK
- Right prick is that prick in which blood comes out by its own.
- Do not squeeze the finger.
- Do not press the finger tip to take out blood. Wherever we press, blood goes away.
How to establish free flow of blood?
If blood drop is not formed satisfactory and pressure is required to be exerted then,
- Squeeze the blood from bottom of finger and slide down toward the fingertip.
- Or you can obstruct the venous blood flow at middle of the finger by gripping it tightly.
- Hand is made to swing downwards to favor the blood flow.
First drop after finger pricking
- First drop of blood is not used and is wiped out by cotton swab to discard. The reason is that it’s mixed with tissue fluid.
- If we use the first drop, the values obtained from that sample will be less.
- In second drop the tissue fluid is thrown out and bleeding is established by pure blood.
- About 3mm of diameter is sufficient for your experimental procedure.
Blood sample- as per individual experiment.
Time- Time is noted immediately when you see the blood in case of Bleeding time and Clotting time experiments.
In other experiments sample is collected and/or used very promptly within 2 mins because our bleeding time is only 2 to 3 minutes and co-agulation time is 3 to 5 minutes.
Later on, the same prick should not be used for collecting blood sample.
We are not allowed to squeeze but to save the time and save ourself from second prick we squeeze and collect the blood.
After sample is collected, the pricking site should be covered with spirit swab and press for about 2 minutes with a thumb to stop further bleeding.
Sample should be used promptly before it clots. So, second prick can be avoided.
How can you be prompt/ save time while finger pricking?
- Keep all instruments ready.
- Keep diluting fluid and all chemicals ready.
- Check pipette for any blockage.
- Prepare slide promptly.
- Fill diluting fluid as quickly as possible for WBC and RBC total count practical.
- Deliver blood in Hb tube and mix acid quickly.
After you complete the experiment, blood-stained cotton swabs, glass utensils and pricking lancets should be washed, reused or discarded appropriately by following the aseptic precautions.




Ur work is very useful to us… Thank you so much mam🥰
Really very nice information,you give all in details.thank you so much…
No comments