
Every medical student and practitioner which ever field they belong are required to learn the Radial Pulse and its clinical method of examination.
This post contains a simple and detailed method to examine the Radial Pulse.
So, read the article carefully and follow the instructions step by step.
WHAT ARE THE PHYSICAL EXAMINATION METHODS FOR MEDICAL STUDENTS?
Methodological requirement of palpating pulse
Artery- Superficially situated and one which is supported by bones.
How many places in the body pulse can be palpated?
- The best places to take your pulse are at your wrist, inside the elbow, at the side of your neck or on the top of your foot, groin, on your temple or behind your knees.
- The pulse felt on the neck is called the Carotid Pulse.
Before you actually start to learn, do not forget to read PALPATION METHOD OF CLINICAL EXAMINATION by following the link.
Why we select Radial pulse?
- Situated on extremities
- Decent examination
- No hesitation of patient
- No specific position of patient required
- Radial pulse is Index of heart.
How radial pulse is the Index of heart?
- Radial pulse rate shows Rhythmicity and heart rate.
- It shows regularity of heart.
- Volume of pulse shows the cardiac output.
- Amplitude- Lift felt at the middle finger is measurement of it.
- Force- Shows systolic blood pressure.
Table of Contents
ToggleWhat is PULSE?
Lateral expansion of Artery is called Pulse.
CAUSES OF THE PULSE
When left ventricle contracts, it ejects the Blood into systemic artery through aorta.
↓
Now, the blood of stroke volume (70 ml) enters in the arteries.
↓
Every artery gets their part.
↓
This flow of blood is in the form of a wave which comes at the time of systole.
↓
The artery expands because of flow of the blood (in form of wave) having pressure.
↓
The wave and pressure diminish after systole is over.
↓
So, pulse is observed as an expansion of vessel with every contraction of heart.
↓
This is why pulse rate is equal to heart rate.
↓
Pulse rate cannot be more than heart rate.
Note: In some cases, pulse wave can be less than that of the heart rate. This is known as APEX PULSE DEFICIT.
Example- Extra rib (cervical rib).

Examination of Radial pulse
- The Radial artery is palpated with the Tips of THREE FINGERS compressing the vessel against the head of radius bone.
- The subject’s forearm should be slightly pronated and the wrist slightly flexed.
- Middle finger feels the pulse, while Distal finger (placed away from heart) prevents reflexions of pulsations from the palmer arch of arteries.
HOW TO EXAMINE PULSE?
Method is PALPATION, using THREE FINGERS keeping in a line, against each other without gap.
Finger tips should be in one line.
Position- Sitting, standing, lying down or mixed. No specific position is required.
Arrangement of arm
- Elbow, shoulder and wrist of subject are kept semi flexed.
- Relaxed
- Examiner must support the arm of subject at wrist.
- No active movement/ holding by subject.
- Arm can be rested on the chest or abdomen in lying down position.
- In sitting or standing position over the table or other things.
Palpation
- Put your 3 lined up fingertips on the course of artery from Lateral half to one inch proximal to root of palm.
- The middle finger should be at the place where the artery is most superficial.
Always approach Laterally
Because on the lateral surface of Radial artery, the maximum surface can be palpated at wrist.
WHY IS PATIENT COMFORT A PRIORITY DURING CLINICAL EXAMINATION?
Reference
In self-method, the right-hand fingers are used, the right hand goes below on lateral side and it will bend for lateral approach.
The right arm will support left arm.
Pulse can be examined in both hands.
METHOD OF EXAMINATION
For best understanding, you need to remember that which finger I am talking about.
Names of fingers
- Middle finger is Middle finger
- Finger proximal to heart is Proximal finger
- Finger distal to heart is Distal finger
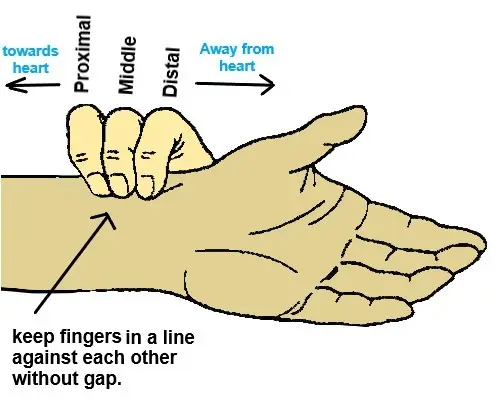
You will learn the use of each finger to palpate radial pulse.
Each finger has different role according to the parameter you observe.
Here is the list of the parameters you can examine with Radial pulse,
- RATE OF PULSE
- RHYTHM
- AMPLITUDE
- FORCE
- TENSION
- CONDITION OF ARTERIAL WALL
1. RATE OF PULSE
- Distal finger is kept hard pressed to stop rebound pulse coming from palm (due to radial and ulnar artery arch). So, the rebound pulse will not reach to Middle finger. This act will prevent double counting.
- Proximal Finger is just resting on the skin. It has no role, not pressed for counting the rate.
- Middle finger is gradually, lightly pressed. Then, gradually pressure is increased and decreased till you palpate the pulse best. Pressure of middle finger is increased and decreased to achieve best palpation. Trial and error are made to achieve optimum pressure for best palpation of pulse by middle finger.
Normal pulse rate
- The normal pulse rate at rest averages about 72/min.
- The rate is normally higher in children: 90-110/ min.
- It is slower at Old age: 55-65/min.
- The pulse rate normally increases during deep inspiration and decreases during deep expiration.
WHY AVOIDING THE TERM “NORMAL” IS ESSENTIAL IN CLINICAL EXAMINATION?
For practice, examine all other arterial pulse and note your observations.
- Brachial- At Elbow
- Carotid- At the neck.
- Femoral- In the Groin region.
- Posterior tibial- Behind medial Malleolus.
- Dorsalis pedis- On the Dorsum of the foot at the midpoint between medial and lateral malleoli, at the base of first metatarsal bone.
2. RHYTHM
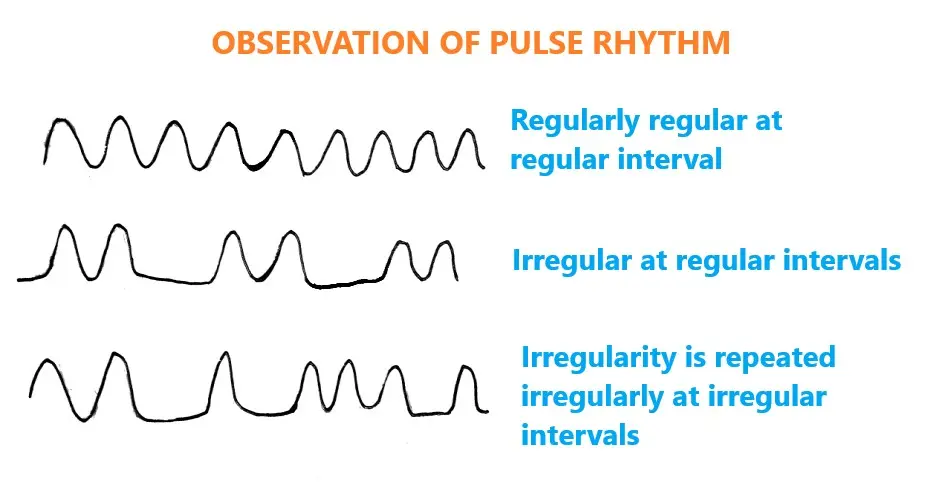
Method to examine the rhythm is same as Rate and observe the following criteria.
- If the pulse is regular?
- If the pulse is Regularly Irregular- Means Irregular at Regular intervals.
- If pulse is Irregularly Irregular- Means the irregularity is repeated irregularly at irregular intervals.
You can understand by studying the image given below.
3. AMPLITUDE
Method to examine the amplitude of pulse is same as the rate examination.
When pulse wave passes below the Middle finger, expansion of the artery is pushing the middle finger upwards which is called LIFTING OF MIDDLE FINGER.
Observation is made at optimum pressure, when pulse is felt best.
Degree of lifting of Middle finger is observed.
Note: When stroke volume is more, amplitude is more, when stroke volume is less, amplitude is less.
OBSERVATIONS OF DEGREE
- Moderate- Usual finding.
- Full and bounding pulse- Lifting is more that indicates more stroke volume and more cardiac output.
- Feeble pulse- When stroke volume is less, lifting is poor or less. This is known as thin and Thready pulse (examples: Cardio vascular shock, Anaphylactic shock, Dehydration-Hypovolaemic shock).
4. FORCE
- Distal finger is kept pressed like the method is described in Rate.
- Proximal finger is just resting on the skin.
- Best palpation by Middle finger is achieved (method described in rate).
- Continue palpating the pulse by Middle finger.
- Now you have to give pressure by Proximal finger on the artery and increase gradually.
- At one point, pressure will be sufficient to stop the pulse coming to middle finger.
The degree of pressure exerted by Proximal finger is your observation.
Degrees are LIGHT, MODERATE and HEAVY.
The degree of pressure is fourth parameter of the pulse examination which is corresponding to the Systolic blood pressure.
- If systolic blood pressure is more, more pressure on proximal finger is required.
- Normotensive situation will require moderate pressure on proximal finger.
- The light pressure is required in hypotensive condition.
5. TENSION
Tension is the Index of Diastolic blood Pressure.
- Distal finger is kept pressed (method is same as rate).
- Middle finger palpates the pulse best.
- Gradually Proximal finger is pressed to stop the pulse coming to Middle finger by giving Optimum pressure.
- Now, you have to press the Middle Finger to COLLAPSE the artery.
Degree of pressure required to collapse the artery is your observation.
When you stop the pulse by Proximal finger, the systolic pressure (systolic wave) is not reaching at the point of artery where your Middle finger is placed.
So here, only Diastolic pressure will be present.
Procedure is collapse of artery by Middle finger.
Observation is based on pressure required.
That is, LIGHT, MODERATE and HEAVY.
- When Diastolic pressure is More, heavy pressure is required to collapse the artery.
- When Diastolic pressure is in Normal range, moderate pressure is required to collapse the artery.
- When Diastolic pressure is Less, less pressure is required to collapse the artery.
6. CONDITION OF ARTERIAL WALL
- Distal finger is kept pressed like the method is described in Rate.
- Palpate the pulse best by Middle finger.
- Then, Proximal finger is kept pressed with optimum pressure sufficient to Stop the Pulse coming to Middle finger.
- Now, artery is emptied by giving pressure on Middle finger.
- Roll the artery under Middle finger.
Empty artery is not palpable by middle finger (as no pulse wave is present) which shows the normal elastic condition of arterial wall.
If the artery is palpable, it means artery have deposition and not fully elastic.
This condition is known as atherosclerosis, where cholesterol deposits make artery rigid and palpable even when it is empty.
OBSERVATION: Empty artery is not palpable.
CONCLUSION
Examination of Pulse is an Art.
It has been studied for so many years.
Even trained physicians require to constant refine their skills.
Students can practice on their own and with friends in order to improve their observations.
I have tried my best to explain each step in most simple way possible.
If you find this article useful, then please share with your friends and practice together.
HAVE A PULSE DAY…







excelelnt explanation
So clear and crisp
Really appreciated Shreya…
Woah! I’m enjoying the template/theme of this website. It’s simple, yet effective. A lot of times it’s very hard to get that “perfect balance” between superb usability and visual appeal. I must say you’ve done a very good job with this.